When you have plantar fasciitis, hiking can be difficult and painful. Hiking is a popular outdoor activity that allows you to connect with nature, but if you have plantar fasciitis, it can ruin your hiking experience.
If you’re seeking a natural method to manage plantar fasciitis during and after hiking, dry cupping is the solution you’re looking for. This ancient emerging treatment method has garnered attention for its potential effectiveness in managing plantar fasciitis.
Throughout this article, we will explain what dry cupping is and its effectiveness in treating plantar fasciitis during and after hiking. We’ll also provide step-by-step instructions on performing dry cupping yourself and where to place the cups for maximum relief. So keep reading to hit the trails again.
What is Dry Cupping Treatment for Plantar Fasciitis Caused by Hiking?
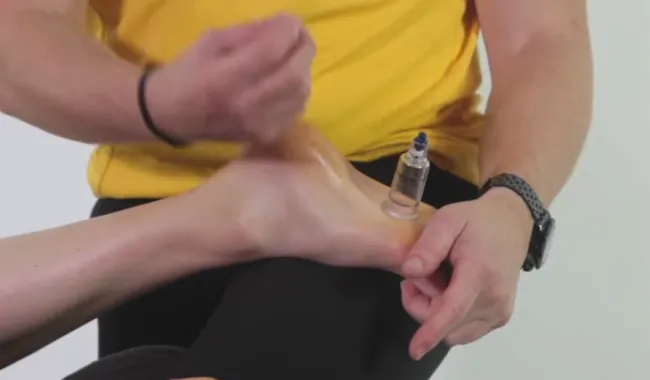
Dry cupping is an alternative but natural therapy for plantar fasciitis before and after hiking to reduce pain and promote healing. This technique involves placing specially designed cups on the skin’s surface, creating a vacuum or negative pressure inside them.
This lifts the skin and underlying tissues, stimulating blood flow and reducing muscle tension. Increased blood circulation helps deliver oxygen and nutrients to the injured tissue, promoting healing.
Although research on dry cupping specifically for plantar fasciitis during or after hiking is limited, some studies have shown promising results when combined with other therapies like TENS therapy. These findings suggest that dry cupping effectively manages foot pain associated with plantar fasciitis.
Effectiveness of Dry Cupping for Plantar Fasciitis During and After Hiking
When considering hiking, dry cupping for plantar fasciitis may sound appealing. These are some of the benefits dry cupping can have on plantar fasciitis:
- During Hiking
- Improved Blood Flow:
- Pain Relief:
- Natural Approach:
- After Hiking:
- Reduced Inflammation:
- Tissue Mobilization:
- Enhanced Healing:
Let’s discuss these in detail:
During the Hiking
During hiking, consider the benefits of dry cupping for plantar fasciitis. This ancient therapy technique involves placing cups on specific points of your feet to improve blood circulation and alleviate pain.
1. Improved Blood Flow
Using dry cupping can help enhance blood flow to the affected area, which may lead to reduced inflammation and pain during hiking. This improved blood flow brings more oxygen to the tissues, promoting healing and reducing discomfort.
Enhanced circulation also helps flush out waste products and toxins from the area, aiding recovery. The increased blood flow also delivers essential nutrients needed for tissue repair.
2. Pain Relief on Trails
For optimal pain relief on trails, you’ll find that cupping can provide temporary relief from discomfort. Cupping creates a suction effect on the skin, helping to stimulate blood flow and alleviate pain.
As you hike, the sensory distraction caused by cupping can help divert your attention away from the discomfort in your feet, allowing you to enjoy the trek with less pain. This temporary relief can make a significant difference in your overall hiking experience.
3. Natural Approach
To naturally manage your foot pain on the trail, a non-invasive and medication-free option like dry cupping is worth considering. This technique involves placing cups on the affected areas to create suction, which helps increase blood flow and promote healing.
Dry cupping has been found to provide relief from plantar fasciitis pain by reducing inflammation, improving range of motion, and alleviating muscle tension. Also, it is a safe and effective alternative for those seeking natural remedies for their foot pain.
2. After Hiking
After a long hike, focusing on your body’s recovery is important. Dry cupping can be an effective technique to help reduce inflammation, improve tissue mobilization, and enhance the healing process.
1. Reduced Inflammation
You can experience less inflammation by trying dry cupping after your hike. Dry cupping involves placing cups on your skin to create suction and increase blood flow. The suction the cups create helps improve blood flow to the affected area, bringing fresh oxygen and nutrients to promote healing.
Cupping can help release toxins and metabolic waste products after you hike that may contribute to inflammation and pain. The gentle pulling action of the cups can relax tense muscles, reducing muscle spasms and promoting overall relaxation.
2. Tissue Mobilization
Mobilizing the tissues through cupping can help improve flexibility and range of motion after a hike. Cupping creates suction on the skin, which helps stimulate blood flow and break up adhesions and scar tissue that may have formed during the hike.
This technique can be particularly beneficial for plantar fasciitis, as it targets the specific areas affected by this condition. Cupping can aid post-hike recovery and enhance overall foot function by increasing circulation and promoting tissue healing.
3. Enhanced Healing
To enhance your healing process, the increased blood flow from cupping can help to promote tissue repair and recovery after a hike.
This improved blood flow delivers essential nutrients and oxygen to damaged tissues, aiding their repair and regeneration. Also, cupping can help reduce inflammation and relieve pain associated with hiking-related injuries.
Dry Cupping for Plantar Fasciitis After Hiking: Steps to Follow
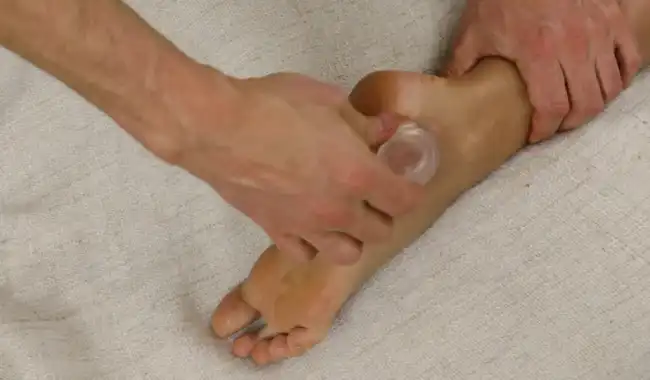
When dry cupping for plantar fasciitis after your hiking trip, there are several steps you need to follow:
STEP 1. Prepare Your Skin for Dry Cupping
Start by cleaning the foot area after you hike where the cups are placed, using mild soap and water or an alcohol swab. This will ensure that your skin is free from dirt and bacteria, which can interfere with the efficiency of dry cupping for plantar fasciitis.
Here’s a simple guide on how to prepare your skin for dry cupping:
- Choose a clean and well-lit area: Find a space to comfortably sit or lie down, ensuring enough room to move around.
- Cleanse the area: Gently wash the targeted area with mild soap and water. Alternatively, you can use an alcohol swab to sanitize the skin thoroughly.
- Dry thoroughly: After cleansing, pat the area dry using a clean towel. This will remove any excess moisture that could affect the suction power of the cups.
STEP 2. Lubricate the Affected Area
Applying a thin lubricant layer helps create a proper seal between the cup and your skin, allowing for effective suction during dry cupping for plantar fasciitis caused by hiking.
This will ensure the cups adhere firmly to the targeted area, maximizing their therapeutic benefits. You enhance the cup’s ability to create negative pressure and lift the underlying tissues by lubricating the affected area with oil, lotion, or gel.
The lubricant reduces friction between your skin and the cup, making it easier to glide the cups smoothly across your foot without causing any discomfort or irritation. Also, this lubrication helps prevent any potential damage to your skin during the cupping process.
STEP 3. Placing the Cups
To place the cups properly for better results, ensure a snug seal by pressing down on the center of the cup’s opening while holding it with one hand. This will create a vacuum effect, allowing the cups to adhere firmly to the skin.
Choose an appropriate cup size based on the size of the treatment area. Selecting a cup covering the affected area is important for optimal results.
STEP 4. Creating Suction
Once you have chosen the appropriate cup size and placed it on the lubricated skin, press down on the center of the cup’s opening to create suction and ensure a tight seal. This is crucial in dry cupping when treating plantar fasciitis due to hiking as it helps to stimulate blood flow and relieve tension in the affected area.
By creating suction, the cups create a vacuum effect that draws stagnant blood and toxins toward the skin’s surface. This helps to promote healing by increasing oxygenation and nutrient delivery to the plantar fascia.
Apply enough pressure while pressing down on the cup’s opening to ensure a proper seal, but be cautious not to cause discomfort or pain.
STEP 5. Suction Duration
Now, you can leave the cups in place for around 5 to 15 minutes, depending on your comfort level and your healthcare provider’s advice. This allows enough time for the suction to effectively target the affected areas of your feet.
During this time, you may experience a mild pulling or tingling sensation as the cups work to increase blood flow and promote healing. Here are a few important things to keep in mind before your dry cupping session for hiking-related plantar fasciitis:
- Follow your healthcare provider’s recommendations: They are best equipped to assess your condition and provide specific guidelines regarding suction duration.
- Be consistent: To see optimal results, it is recommended you as a hiker to undergo regular dry cupping sessions as part of an overall treatment plan for plantar fasciitis.
STEP 6. Removing the Cups
When removing the cups, press down on the skin near the edge of the cup to gently release the suction. This is crucial to prevent any discomfort or injury.
By pressing down on the skin, you are effectively breaking the seal created by the suction and allowing for easy removal of the cup. Avoid pulling directly on the cup, as this can cause unnecessary pain and potential damage to your skin.
Instead, focus on applying gentle pressure around the edges of the cup until you feel it loosen from your skin. Once released, carefully lift off the cup and set it aside.
Where should you place the dry cupping cups for plantar fasciitis after hiking?
To determine where to place the cups after your hiking excursion to achieve the best results, there are a few key points to keep in mind:
- Target the specific pain area: Identify where you feel the most discomfort or tenderness during your hiking session. This is typically around the heel or arch of the foot.
- Cover a larger area if necessary: If your pain extends beyond a specific spot, consider placing multiple cups in a pattern that covers a larger surface area of your foot.
- Consult with a professional if unsure: If you’re unsure where to place the cup or if you’re afraid of dry cupping to relieve hiking pain, it’s always best to consult a healthcare provider or experienced practitioner who can guide you through the process.
Is there a pressure point for plantar fasciitis during hiking?
While no pressure point is dedicated solely to plantar fasciitis during hiking, certain areas can be targeted to alleviate its pain and discomfort.
One such area is located at the depression between your big toe and second toe. While hiking along a trail, this region is known as a pressure point, and targeting it during dry cupping can help relieve plantar fasciitis symptoms.
Applying suction cups to this area stimulates larger nerve fibers that block pain perception while also triggering the release of endorphins, which naturally reduce pain.
Can I perform dry cupping myself for Plantar Fasciitis after the hiking trip?
To relieve the symptoms of plantar fasciitis after hiking, it is possible to perform dry cupping at home on your own. Many kits available commercially allow you to practice cupping at home, but it is advisable to consult your physician before beginning the procedure.
Experience Pain Relief and Recovery from Plantar Fasciitis with Dry Cupping for Hiking Enthusiasts
For hiking enthusiasts battling plantar fasciitis, the potential benefits of dry cupping are intriguing. By increasing blood flow, providing pain relief, and aiding recovery, this ancient therapy is the boost you need to conquer the trials.
Following the simple steps and placing the cups strategically on your feet, you can target those pressure points and alleviate the pain like never before. And guess what? You don’t even need a professional to do it. With some practice, you can become your cupping expert.
Remember, the great outdoors await, and with the right strategies, plantar fasciitis doesn’t have to hold you back.

Leave a Reply